Gettin’ off the Juice Leave a comment
Get a PDF Download of this article here.
Gettin’ off the Juice
by Steve Watson, Watson’s StreetWorks
Replacing a Hydraulic Brake Switch with an Adjustable/Mechanical Unit
How many times am I going to let it
happen this year? How many times will
some guy yell at me on the freeway,
“Hey buddy! Your brake lights are out!”
How many times will I have to jack up
the old buggy, crawl under in the
standard mechanics position – face up –
under the master cylinder to once again
change that hydraulic brake switch? How
many times will I have to open up the
brake fluid system and bleed the brakes
– just the front ones if I’m really lucky.
How many times? Never again! I’m
going to fix it right this time.
And what’s with these things anyway? Why
do they burn out? A quick call to Watson’s
StreetWorks gave me the answer. It seems
that they have been working for years to
help people get rid of the hydraulic switches
and replace them with their adjustable
mechanical brake switch. Carol Watson
explained it to me this way, ” Hydraulic
switches are usually only rated at about 4 to
5 amps max. Internally, they have butt type
contacts. When the system is pressurized, a
little disc inside the switch moves up to
touch the two contact pins.

When this happens, a small arc occurs and
the arc causes carbon and oxides on the
contacts. After repeated use, these build up
and require more and more pressure to
make the electrical connection. Eventually,
the switch stops working all together. If you
cut a bad one in half, you can see the
buildup on the disc and contacts.
She hooked me up with one of their
switches. It is meant for the through-thefloor-board
type pedal on my ’34 and has an
adjustable arm so that I can set how quickly
it will turn on the brake lights. That’s very
important for two reasons – for getting faster
response time to the guy following and for
tripping cruise control without needing to
pressurize the brake system.
It also has wiping type contacts that help to
keep themselves clean, and double the
amperage of my old switch. A nylon roller
sits at 90-degrees off the switch arm and
gives a low friction surface for the brake
pedal arm to contact.
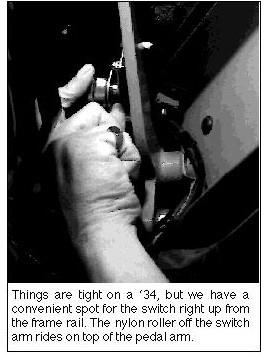
The accompanying photos pretty well
show just how easy it is to install. A spot
about 5 inches from the pedal-arm pivot
was convenient. Drill two holes through
the floor, attach the switch with the
stainless hardware included, pop on the
same wire leads as were on the old
switch (new terminals are included, too)
and we’re half way home.


Adjustment required the use of your classic
low tech wood block (not included with the
switch but readily available in our shop). The
block goes under the pedal arm to simulate
where in the pedal travel we want the switch
to activate. Move the switch arm to match, tighten and it’s done!

This switch is rated for 8 to 10 amps. Had
we been running halogen brake lights,
Watson’s recommend using a relay as well.
But for our 1157 bulbs or for LED brake
lights, a relay isn’t needed.
Wish everything on the rod went in as easy
and worked as well.
Get a PDF Download of this article here.