How to Ground a Wire in a Car: A Step-by-Step Guide for Safe Electrical Connections Leave a comment
How to Ground a Wire in a Car: A Step-by-Step Guide for Safe Electrical Connections
Grounding a wire in your car might sound like a no-brainer, but a bad ground can turn your slick hot rod into a rolling electrical nightmare. If your gauges are dancing, your lights are flickering, or that sweet stereo setup is cutting out, chances are you’ve got a grounding issue.
Don’t sweat it—dialing in a clean, solid ground isn’t rocket science, but it is the foundation of any reliable automotive electrical system. In this guide, we’ll walk you through the nuts and bolts of grounding a car wire the right way.


The Basics of Grounding in a Car
Grounding a wire might not be the flashiest part of building or restoring your ride, but it’s one of the most important. In any automotive electrical system, the ground acts as the backbone, carrying electrical current back to the battery to complete the circuit. No ground, no go—that’s the bottom line.
For hot rodders, the stakes are even higher. Custom mods like aftermarket lights, gauges, and audio systems demand reliable wiring. A weak or improper ground can cause voltage drops, leaving you with dim lights, wonky meters, or even gear that flat-out doesn’t work. Worst case? You could end up damaging expensive components or chasing electrical gremlins through your wiring harness for weeks.
Tools and Materials You’ll Need
Getting the job done right starts with having the right tools in your box. Grounding a wire isn’t complicated, but it’s all about precision and attention to detail. Before you dive under the hood, here’s what you’ll need to make sure your automotive wiring and electrical systems are rock solid:
Essential Tools
Before you start sanding, crimping, or testing, you’ll want to gather the tools that make grounding quick, easy, and professional:
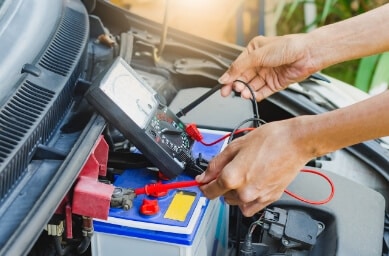
- Multimeter: Your go-to for testing continuity and verifying a strong ground. Without this, you’re flying blind.
- Wire Strippers and Crimping Tool: Clean cuts and solid crimps are non-negotiable for proper connections.
- Wire Brush or Sandpaper: Paint, rust, and grime are your enemies. These tools will help you prep the surface for a solid connection.
Key Materials
Tools are only half the equation—pair them with the right materials to ensure your ground is durable and dependable. Here’s what you’ll need to complete the connection:
- Grounding Wire: Use high-quality, appropriately gauged wire for your specific setup. Thicker wire (e.g., 10- or 12-gauge) is ideal for higher-power applications.
- Ring Terminals: These ensure a secure and professional connection to your grounding point. Choose corrosion-resistant options for longevity.
- Dielectric Grease: Protect your connection from moisture and corrosion.
- Heat-Shrink Tubing or Electrical Tape: Seal the connection for durability and to prevent accidental shorts.
- Corrosion-Resistant Bolts or Screws: Hardware that can stand up to the elements is crucial for lasting performance.
Optional But Handy
While not always necessary, these extras can be lifesavers if you run into stubborn grounding points or need a clean slate:
- Drill with Metal Bits: For creating a fresh grounding point if the factory locations don’t cut it.
- Battery Terminal Cleaner: While you’re at it, clean up your battery connections to ensure a stable electrical flow.
Step-by-Step Guide to Grounding a Wire in a Car
Grounding a wire might seem simple, but doing it right takes some know-how. Follow these steps to ground your wire like a pro and avoid the pitfalls of weak connections.
Step 1: Choose the Perfect Grounding Spot
Finding the right spot is the foundation of any successful ground.
- Look for bare, unpainted metal on the vehicle’s body or chassis. Avoid painted or coated surfaces—these act as insulators and prevent a proper connection.
- Keep the ground point as close as possible to the component you’re grounding. Shorter wires mean less resistance and better performance.
Step 2: Prep the Surface
A good ground starts with clean, shiny metal-to-metal contact.
- Use sandpaper or a wire brush to remove paint, rust, or debris from the grounding point.
- Clean the prepped area with a rag and isopropyl alcohol to remove any leftover residue.
Step 3: Crimp and Connect the Ground Wire
A secure, well-crimped connection is key to long-term reliability.
- Cut the grounding wire to the appropriate length, ensuring it reaches the grounding point with some slack.
- Strip the insulation off the wire, leaving about ¼ inch of bare metal exposed.
- Attach a ring terminal to the wire using a proper crimping tool. A solid crimp ensures the wire stays put even under vibration.
Step 4: Secure the Connection
Lock everything in place for a strong, lasting ground.
- Attach the ring terminal to the prepped grounding point using a corrosion-resistant screw or bolt. Tighten it firmly, but don’t overtighten to the point of damaging the terminal.
- Double-check that the connection is tight and that the terminal is flush against the bare metal.
Step 5: Protect the Connection
Exposure to moisture and corrosion can ruin a great ground over time, so don’t skip this step.
- Apply a thin layer of dielectric grease over the connection to shield it from rust and oxidation.
- Cover the exposed terminal and bolt with heat-shrink tubing or electrical tape for extra protection, especially in high-moisture areas.
Step 6: Test Your Ground
Don’t assume—it’s always best to test your work.
- Use a multimeter set to continuity mode. Place one probe on the grounding point and the other on the vehicle’s chassis or battery-negative terminal. A low resistance reading means your ground is good to go.
- Reconnect the battery and test the component you grounded. If it’s working perfectly, you’ve nailed it.
Pro Tips for Hot Rodders
When it comes to wiring a hot rod, good grounding isn’t just functional—it’s an art form. Custom builds push your automotive electrical system to the limit, demanding top-notch craftsmanship and attention to detail. These pro tips will help you take your grounding game to the next level and avoid headaches down the road.
How to Find a Loose Ground Wire In a Car
Tracking down a bad or loose ground wire can feel like chasing a ghost, but here’s a tried-and-true process:
- Look for symptoms: Flickering lights, erratic gauges, or intermittent power losses are red flags.
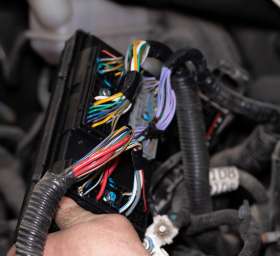
- Inspect visually: Check grounding points for loose bolts, corroded terminals, or frayed wires.
- Test with a multimeter: Use the continuity or resistance setting to check if the ground connection is solid. A high resistance reading usually indicates a bad connection.
- Wiggle wires: Gently move suspect wires while observing the connected component. If it flickers or shuts off, you’ve likely found the issue.
Use Dedicated Ground Wires for High-Power Components
Running a big amp, aftermarket fuel pump, or custom lighting setup? Don’t rely solely on grounding to the chassis. Instead, run a dedicated ground wire directly to the battery’s negative terminal. This ensures maximum current flow and minimizes electrical noise that can interfere with sensitive components.
Reinforce Factory Grounding Points
Factory grounds were designed for stock setups—not for the demands of modern upgrades. Take the time to inspect and upgrade these spots by:
- Adding a second, thicker ground strap between the chassis and the battery.
- Cleaning and re-securing factory grounding bolts to improve conductivity.
- Replacing aging wires with high-quality alternatives, like those available from Watson’s StreetWorks.
Plan Your Wiring Layout Like a Pro
Messy wiring can lead to crossed signals and grounding issues. When designing your wiring setup:
- Route ground wires away from moving parts, heat sources, and sharp edges.
- Group wires neatly using zip ties or wire looms to prevent accidental damage.
- Always leave a little slack in your wires to account for vibration and adjustments.
Test as You Build
Don’t wait until you’ve wired the entire system to test your grounds. As you install each component, use a multimeter to verify continuity and low resistance. This step-by-step testing approach makes it easier to isolate and fix issues before they snowball.
Don’t Skimp on Quality
When it comes to custom hot rods, you get what you pay for. Cheap wires and hardware may work short-term, but they won’t stand up to vibration, heat, or moisture. Invest in high-quality components—like the wiring and accessories offered by Watson’s StreetWorks—to avoid troubleshooting electrical gremlins after every cruise.
Hot Rod Wisdom
Building or restoring a hot rod is all about control, precision, and pride. Don’t let poor grounding sabotage your build. By following these pro tips, you’ll create an electrical system that’s as reliable and performance-ready as the rest of your ride. And remember, when you need premium parts to match your craftsmanship, Watson’s StreetWorks has your back.
Tech Talk: Hot Dot Push Start with RFID
Want to learn more about the hot-rod wiring products available at Watson’s StreetWorks? Check out this quick video for a look at one of our favorites—the Hot Dot Push Start with RFID.
Wire It Right: Find Premium Solutions for Hot Rod Perfection at Watson’s
When wiring your hot rod, every connection matters. That’s why Watson’s StreetWorks has spent over three decades crafting premium-grade wiring products that are as reliable as they are innovative. From LED conversion kits to high-quality push-to-start systems, our parts are built with hot rodders in mind.
With award-winning designs and a reputation for top-notch craftsmanship, Watson’s StreetWorks offers the wiring solutions you need to bring your vision to life. Shop our selection today and wire your ride with confidence.
Frequently Asked Questions: Automotive Wiring and Electrical Systems
Grounding a wire in your car might seem straightforward, but it’s one of those things that sparks a lot of questions—especially for hot rod enthusiasts diving into custom wiring. Here are some common concerns and clear answers to keep your build running smoothly and problem-free.
How much does it cost to fix a ground wire in a car?
The cost depends on whether you’re handling the repair yourself or taking it to a shop. If you already have the tools, you’re looking at around $10–$30 for quality grounding wire, terminals, and dielectric grease. A shop might charge $50–$150, depending on the complexity of the issue and labor rates. For hot rodders, it’s almost always worth learning to DIY. Not only do you save cash, but you also gain the skills to troubleshoot future issues.
Can a bad ground damage my components?
Absolutely. Poor grounding can lead to voltage spikes or drops, which can fry sensitive electronics like ECUs, amplifiers, and aftermarket gauges. A weak ground can also force your system to draw power inefficiently, leading to overheating or premature wear on components. That’s why getting your grounding right is non-negotiable in any custom build.
Can I add modern electrical components to a classic car?
Absolutely! Adding components like LED lights, advanced gauges, or sound systems is a popular way to modernize classic cars. However, it’s essential to upgrade the wiring and electrical system to handle the increased power demands. Proper grounding and high-quality wiring are must-haves for safe installation.
Related Articles
When it’s time to update your hot rod, this guide will provide the details you need on installing a wiring harness.

Learn the ins and outs of wiring kits and panels, including essential questions you should ask.

Almost from the first day that a Beetle drove the roads, VW restoration products were needed. Now don’t get us wrong. VW’s weren’t built to break down…